Nessus via MSFconsole
a11y.text Nessus via MSFconsoleNessus Vulnerability Scanning Directly in Metasploit
a11y.text Nessus Vulnerability Scanning Directly in MetasploitFor those situations where we choose to remain at the command line, there is also the option to connect to a Nessus version 4.4.x server directly from within msfconsole. The Nessus Bridge, written by Zate and covered in detail at http://blog.zate.org/2010/09/26/nessus-bridge-for-metasploit-intro/ uses xmlrpc to connect to a server instance of Nessus, allowing us to perform and import a vulnerability scan rather than doing a manual import.
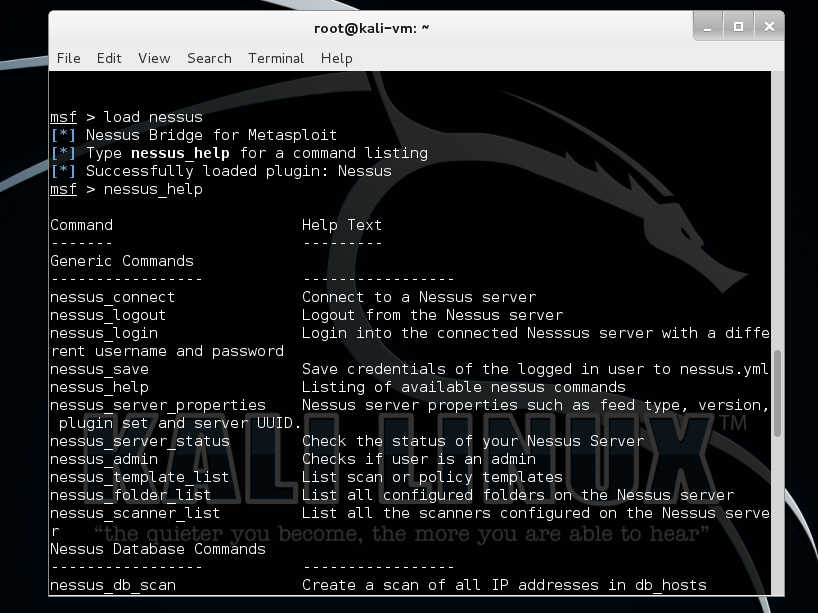
We begin by first loading the Nessus Bridge Plugin.
msf > load nessus
[*] Nessus Bridge for Metasploit 1.1
[+] Type nessus_help for a command listing
[*] Successfully loaded plugin: nessus
Running nessus_help will display the msfconole commands now available to us. As you can see, it is quite full-featured.
msf > nessus_help
[+] Nessus Help
[+] type nessus_help command for help with specific commands

Command                    Help Text
-------                    ---------
Generic Commands
-----------------          -----------------
nessus_connect             Connect to a nessus server
nessus_logout              Logout from the nessus server
nessus_help                Listing of available nessus commands
nessus_server_status       Check the status of your Nessus Server
nessus_admin               Checks if user is an admin
nessus_server_feed         Nessus Feed Type
nessus_find_targets        Try to find vulnerable targets from a report

Reports Commands
-----------------          -----------------
nessus_report_list         List all Nessus reports
nessus_report_get          Import a report from the nessus server in Nessus v2 format
nessus_report_hosts        Get list of hosts from a report
nessus_report_host_ports   Get list of open ports from a host from a report
nessus_report_host_detail  Detail from a report item on a host

Scan Commands
-----------------          -----------------
nessus_scan_new            Create new Nessus Scan
nessus_scan_status         List all currently running Nessus scans
...snip...
Prior to beginning, we need to connect to the Nessus server on our network. Note that we need to add ‘ok’ at the end of the connection string to acknowledge the risk of man-in-the-middle attacks being possible.
msf > nessus_connect dook:s3cr3t@192.168.1.100
[-] Warning: SSL connections are not verified in this release, it is possible for an attacker
[-]          with the ability to man-in-the-middle the Nessus traffic to capture the Nessus
[-]          credentials. If you are running this on a trusted network, please pass in 'ok'
[-]          as an additional parameter to this command.
msf > nessus_connect dook:s3cr3t@192.168.1.100 ok
[*] Connecting to https://192.168.1.100:8834/ as dook
[*] Authenticated
msf >
To see the scan policies that are available on the server, we issue the nessus_policy_list command. If there are not any policies available, this means that you will need to connect to the Nessus GUI and create one before being able to use it.
msf > nessus_policy_list
[+] Nessus Policy List

ID  Name       Owner  visability
--  ----       -----  ----------
1   the_works  dook   private

msf >
To run a Nessus scan using our existing policy, use the command nessus_scan_new followed by the policy ID number, a name for your scan, and the target.
msf > nessus_scan_new
[*] Usage:
[*]        nessus_scan_new policy id scan name targets
[*]        use nessus_policy_list to list all available policies
msf > nessus_scan_new 1 pwnage 192.168.1.161
[*] Creating scan from policy number 1, called "pwnage" and scanning 192.168.1.161
[*] Scan started.  uid is 9d337e9b-82c7-89a1-a194-4ef154b82f624de2444e6ad18a1f
msf >
To see the progress of our scan, we run nessus_scan_status. Note that there is no progress indicator so we keep running the command until we see the message ‘No Scans Running’.
msf > nessus_scan_status
[+] Running Scans

Scan ID                                               Name    Owner  Started            Status   Current Hosts  Total Hosts
-------                                               ----    -----  -------            ------   -------------  -----------
9d337e9b-82c7-89a1-a194-4ef154b82f624de2444e6ad18a1f  pwnage  dook   19:39 Sep 27 2010  running  0              1


[*] You can:
[+]         Import Nessus report to database :     nessus_report_get reportid
[+]         Pause a nessus scan :             nessus_scan_pause scanid
msf > nessus_scan_status
[*] No Scans Running.
[*] You can:
[*]         List of completed scans:         nessus_report_list
[*]         Create a scan:                   nessus_scan_new policy id scan name target(s)
msf >
When Nessus completes the scan, it generates a report for us with the results. To view the list of available reports, we run the nessus_report_list command. To import a report, we run nessus_report_get followed by the report ID.
msf > nessus_report_list
[+] Nessus Report List

ID                                                    Name    Status     Date
--                                                    ----    ------     ----
9d337e9b-82c7-89a1-a194-4ef154b82f624de2444e6ad18a1f  pwnage  completed  19:47 Sep 27 2010

[*] You can:
[*]         Get a list of hosts from the report:          nessus_report_hosts report id
msf > nessus_report_get
[*] Usage:
[*]        nessus_report_get report id
[*]        use nessus_report_list to list all available reports for importing
msf > nessus_report_get 9d337e9b-82c7-89a1-a194-4ef154b82f624de2444e6ad18a1f
[*] importing 9d337e9b-82c7-89a1-a194-4ef154b82f624de2444e6ad18a1f
msf >
With the report imported, we can list the hosts and vulnerabilities just as we could when importing a report manually.
msf > hosts -c address,vulns

Hosts
=====

address        vulns
-------        -----
192.168.1.161  33

msf > vulns
[*] Time: 2010-09-28 01:51:37 UTC Vuln: host=192.168.1.161 port=3389 proto=tcp name=NSS-10940 refs=
[*] Time: 2010-09-28 01:51:37 UTC Vuln: host=192.168.1.161 port=1900 proto=udp name=NSS-35713 refs=
[*] Time: 2010-09-28 01:51:37 UTC Vuln: host=192.168.1.161 port=1030 proto=tcp name=NSS-22319 refs=
[*] Time: 2010-09-28 01:51:37 UTC Vuln: host=192.168.1.161 port=445 proto=tcp name=NSS-10396 refs=
[*] Time: 2010-09-28 01:51:38 UTC Vuln: host=192.168.1.161 port=445 proto=tcp name=NSS-10860 refs=CVE-2000-1200,BID-959,OSVDB-714
[*] Time: 2010-09-28 01:51:38 UTC Vuln: host=192.168.1.161 port=445 proto=tcp name=NSS-10859 refs=CVE-2000-1200,BID-959,OSVDB-715
[*] Time: 2010-09-28 01:51:39 UTC Vuln: host=192.168.1.161 port=445 proto=tcp name=NSS-18502 refs=CVE-2005-1206,BID-13942,IAVA-2005-t-0019
[*] Time: 2010-09-28 01:51:40 UTC Vuln: host=192.168.1.161 port=445 proto=tcp name=NSS-20928 refs=CVE-2006-0013,BID-16636,OSVDB-23134
[*] Time: 2010-09-28 01:51:41 UTC Vuln: host=192.168.1.161 port=445 proto=tcp name=NSS-35362 refs=CVE-2008-4834,BID-31179,OSVDB-48153
[*] Time: 2010-09-28 01:51:41 UTC Vuln: host=192.168.1.161
...snip...
Nessus plugin loaded in msfconsole | Metasploit Unleashed
You should now have an understanding of how to manually import Nessus scan results as well as use the Nessus Bridge plugin directly within the Metasploit Framework to scan for vulnerabilities.